Showing posts with label baking. Show all posts

Monday, August 26, 2013

So Long, Summer: Almond Butter Ice Cream Bread


Do you have leftover ice cream in your freezer that you don’t know what to do with now that summer is ending? Do you have five gallons of custom-made almond butter ice cream that your significant other gifted you?  Well, have I got the recipe for you. 

20130824_094720

You can make bread out of ice cream!

I first learned about this from Rasa Malaysia’s Chocolate Chip Cookie Dough bread.  The recipe calls for two ingredients: ice cream and self-raising flour, so I was a little skeptical at first.  Wouldn’t it just out to just become a puddle of warm melted ice cream? How would this work?  But since I had tons of almond butter ice cream left, I didn’t have much to lose.  I didn’t have self-rising flour, so I followed the tips from the recipe and used a mixture of all-purpose flour, baking powder, and salt. 

Turns out ice cream makes great bread!  This bread was so moist and rich, you could never tell that it was made out of ice cream. I sliced up the bread and brought it to book club, where it was a hit.  (Here’s a tip, when bringing a loaf of bread or cake, or other dessert that involves slicing, to a party, slice it up at home and arrange it aesthetically on a plate, preferably a disposable one, cover it in foil, and bring it to the party.  This way, no one will notice that the slice you ate to “test” it, is gone!) Next time, I’m going to make these into muffins – who says you can’t have ice cream for breakfast?

Almond Butter Ice Cream Bread

Adapted from Rasa Malaysia

Ingredients:

  • 2 to 3 cups almond butter ice cream (or any flavor), softened* See note
  • 1 1/2 cups all-purpose flour
  • 2 1/4 tsp baking powder
  • 1 tsp salt
  • 1/2 cup chocolate chips
  • Cooking spray

Method:

Preheat oven to 350 degrees.  Combine flour, baking powder, and salt. Mix softened ice cream and flour mixture until combined. Stir in chocolate chips.  Pour batter into an 8” x 4” loaf pan.  Bake for about 60 minutes, or until a toothpick comes out clean.

Note:

I did not wait long enough to soften the ice cream.  (What can I say, I’m impatient.)  So when I mixed the 2 cups of ice cream  the recipe called for, I found the batter was dry and crumbly.  So I kept adding more and more ice cream.  Then the ice cream melted a little, and the batter was probably too wet, which might be why it took so long to bake.  So I recommend starting with two cups of softened ice cream, and adding more bit by bit until you get the sticky bread batter consistency. 

Sunday, December 9, 2012

Christmas Cake Pops


For my birthday, approximately seven months ago, I got a Cake Pop Maker from my friend, La (Thanks, La!). While a gracious gift, it was also around the time I was moving to a new apartment, so the cake pop maker and accessories went into a box and got stored away into a closet. (Sorry, La.) But they were not forgotten! Last week, J. and I hosted a Secret Santa exchange among a few friends in town, and I thought, what better time to finally make use of my cake pop maker? Who wouldn't want little white "snowballs" festively dotted with green and red sprinkles?

For those of you have never seen a cake pop maker, imagine a waffle iron, with plates that have these little round indentations instead of the "waffle" shape.  Or look at the picture here. It comes with a cake pop stand to use for cooling the cakes and to hold the cake pops after frosting them. And La was generous to also get me the "chocolatier" for dipping in the frosting (essentially it is a miniature crock-pot).

This actually turned out to be a fun project. Although one downside of the cake pop maker is that it only makes 12 cake pops at a time, and the recipes all make about 36 cake pops, so that means you have to bake them in batches.

I used the vanilla cake recipe and the vanilla frosting dip recipe from the cake pop maker manual.  The manual also has some handy tips in there.  For example, I learned that it was easier to freeze the cake balls for five minutes before dipping them in frosting made the process easier.  And dipping the stick in the frosting before jabbing them into the cake balls helps to keep the cake from falling off the stick.  I've never tried making cake pops without a cake pop maker, so I couldn't tell you if it was any easier.  I do like that it only took about four minutes to cook each batch.

I decorated the pops with red and green Christmas Sprinkles and crushed candy canes.  A note on the cake pops with candy canes - the red dye on the candy canes will start to run if you make the cake pops too far in advance.  They still taste good, but I recommend serving them the day of so they stay crisp and pretty when you serve them to guests, and don't look like mangled eyeballs.  (Though something to keep in mind if we ever serve them at a Halloween party!)

I'm looking forward to testing out the other recipes in the manual (I read somewhere it is better to use the recipes in the manual when using the cake pop maker since they are especially formulated for it).  Next I hope to make the apple cider doughnut holes or the red velvet cake pops.


Monday, October 8, 2012

Apple and Cranberry Softies


My friend, Rosann, invited me to guest post at her food blog - Just Prepare It Deliciously.  Check out my Apple and Cranberry Softies, where I explore low-calorie baking (each cookie is 107 calories!)

Saturday, August 4, 2012

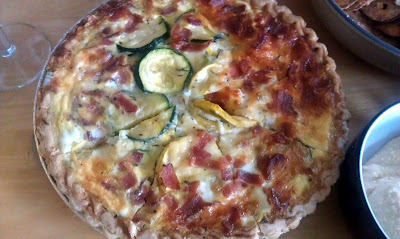
Book Club Quiche (Summer Squash, Bacon, and Mozzarella Quiche)


Earlier this year, my friend Rosann started a book club with a few friends. At the last few meetings we met at restaurants, but this month I volunteered to host.  I was excited about this opportunity because I finally have an apartment that is big enough for hosting and somewhat centrally located.  So I made this quiche to serve my lovely guests as we sipped mimosas and discussed The Age of Miracles by Karen Thompson Walker, (which, by the way, is a very good read, I highly recommend it).  I chose this recipe from Cooking Light, mostly because it boasted to be "healthy."  But instead of making my own crust as the recipe calls for, I used store-bought crust.  I also substituted fresh thyme with fresh savory.  Nonetheless, it was a popular dish at the book club!

Thursday, December 30, 2010

Marbles aka "Sour Cream Cookies"


The first time I made these cookies was when I was living in Philadelphia. My roommate at the time, who wasn't much of a cookie eater, loved these cookies and now will bake them on her own. She calls them "Cheryl's Sour Cream Cookies" - and even though that doesn't sound very appetizing, sour cream is actually a key ingredient in this recipe to give the cookies a subtle creamy, tangy taste. You can't taste the sour cream, really. And the reason why I chose to make these cookies? Yup, you guessed it, to use up leftover sour cream. And because they're tasty cookies.

But despite my former roommate attributing these cookies to me, I can't take credit for the recipe, though - I got it from Mrs. Field's Best Ever Cookie Book, which has been reproduced here and here.
Posted by Picasa

Tuesday, December 28, 2010

Dairy-Free Banana Muffins


You might recognize this old brown wooden table - I made these muffins when I was at my parents' house for Christmas this weekend. Before I moved to my own place, this table was the setting for my blog and it brought back memories...

But what my parents' kitchen does lacks, now that I am no longer living there, is most of the essentials for baking, namely, spices, seasonings, and measuring cups. My parents' kitchen is an Asian kitchen, meaning the only spices and seasonings you'll find in their pantry are five-spice powder and MSG. And no measuring implements. When I lived there, I was the one who maintained the spice rack, and took everything with me when I moved to my own apartment.

So in my homecoming holiday weekend, I wanted to bake something for Christmas brunch with the fam. In the pantry, I found about a cup and a half of flour, baking soda, and sugar that I had left behind. I dug up an old set of measuring cups, (no idea where they came from - but they were dusty from disuse). I found one lone measuring teaspoon that had been separated from the rest of the ring of spoons when I moved out. (I ended up having to buy new measuring spoons for my new apartment). And three overripe bananas. (Don't worry, I am sure my mom bought those recently - they were not left behind from when I moved out six months ago!)

Fortunately, my 21-month old Nephew loves bananas, so I knew the perfect food to make for Christmas brunch - banana muffins. I used this recipe for banana bread from Simply Recipes, only with a few tweaks. The Nephew is allergic to dairy - which worked out because my parents didn't have any real butter - only butter spread. So I substituted vegetable oil for the butter. And I have to say, I could not tell the difference. The only ingredient that would have really helped was vanilla extract - but I had to omit that since well, there wasn't any in the house. Other additions that I feel would have been nice, had I had the benefit of my own kitchen were to sprinkle some cinnamon and nutmeg into the batter. But the finished product that I had was still good - I ate four of them when they were still warm from the oven! Without the added spices, this recipe produces a pure, unadulterated banana muffin.

Dairy-Free Banana Muffins
Adapted from Simply Recipes

3 ripe bananas
1 1/2 cups all-purpose flour
1 cup granulated sugar
1/3 cup vegetable oil
1 tsp baking soda
1 egg, beaten
Pinch of salt

In a large bowl, mash the bananas with a fork. Then mix in sugar, oil, and eggs. Sprinkle in salt and baking soda. Then slowly incorporate flour into the mixture until just combined. Spoon mixture into a muffin pan lined with muffin cups. Bake for about 30 minutes at 350 degrees. Makes about 16 small muffins, or 12 regular-sized muffins.
Posted by Picasa

Sunday, February 7, 2010

Mudslide Cookies


When I first saw these cookies on Chocolate and Zucchini, I have to admit, I was expecting them to be cookies inspired by the ever-popular cocktail drink. Although I was a bit disappointed that there was no alcohol involved in these cookies, I will still intrigued by Clotilde's characterization of these cookies as "insanely chocolatey." With Valentine's Day around the corner, I had to try them out myself.

Because these cookies are "insanely chocolately," Clotilde stresses the importance of high quality chocolate. I used Ghiradelli bittersweet chocolate chips for melting and a Ghiradelli bittersweet bar, chopped and mixed into the batter. I also substituted walnuts instead of pecans because thats what I had, but pecans would be good too.

Click here for the recipe on Chocolate and Zucchini.
Posted by Picasa

Thursday, September 17, 2009

Cheesecake-swirled Brownies


As promised, this was the dessert from our "Cooking with Suvarna" adventure. We used the recipe from the Smitten Kitchen, with a few minor uhh... let's call them "adjustments." Now, this recipe provides that you prepare the brownie batter, and then the cheesecake batter, and then swirl the cheesecake batter on top of the brownie batter. Easy, right?

Well, the brownie batter whisked up perfectly...


But when we made the cheesecake batter was when the cooking wheels started to fall off. First, we didn't use "well-softened" (i.e. room temperature) cream cheese as the recipe calls for. Apparently, nuking it in the microwave for 10 seconds did not cut it. Then, instead of just using the egg yolk, we accidentally cracked the whole egg, white and yolk, into the batter (oops!). The end result was cream cheese batter that had little lumps of cream cheese in it that looked like this.


But we were not discouraged - we are, after all, soon-to-be attorneys, here! First we tried using an electric mixer to smooth out the batter. When that didn't work, we tried using the masher thingy that you see in the picture here, but to no avail. So then we tried letting the mixture sit at room temperature to see if the lumps would just "melt" away. Wishful thinking. That's when we contemplated just trashing this batch and whip up a new batch of cream cheese mixture. But, since I am not one to waste perfectly good ingredients, I insisted on trying to use the lumpy cream cheese goo and poured it right on top of the brownie batter in the pan and swirled it around. (Which became a little harder to do since the brownie batter started to congeal a bit from sitting at room temperature for so long). Nonetheless, the brownies still came out wonderfully gooey and chocolatey, the way brownies are meant to be, cold cream cheese and egg white be damned.


See, I'm eating one right here!


Click here for the recipe from Smitten Kitchen.


Posted by Picasa

Sunday, September 13, 2009

Cooking with Suvarna!


This post is to prove that lawyers are not just soulless, money-grubbing, ambulance chasers. Some of us can cook too! Suvarna was gracious enough to let me raid her kitchen for a day (Thanks, Suvarna!) Hence, the much classier table setting here, rather than my usual ugly brown wooden table. On the menu was baked macaroni and cheese, fresh spinach salad (pictured above), and cheesecake-swirled brownies. The mac and cheese turned our rich, creamy, and delicious because we followed the recipe (more or less). The cheesecake-swirled brownies came out soft and chewy and well, chocolatey - despite a minor scare of what we thought would doom the brownies (more on that in another post).


Baked Macaroni and Cheese fresh and bubbly in the oven


Baked Macaroni and Cheese
adapted from Everyday Food (original recipe here)

Ingredients:
1 pound elbow pasta
5 Tbs butter
1/4 cup all-purpose flour
4 cups whole milk
3 cups shredded sharp cheddar cheese
1 cup freshly grated Parmesan cheese
1/2 cup Italian-style bread crumbs
salt and pepper

Method:
1. Preheat oven at 375 degrees.

2. Boil pasta in salted water for about two minutes less than instructed on the box. Drain and rinse in cold water to stop the cooking process. (It will cook more in the oven). Return to the cooking pot.

3. While the pasta is cooking, melt 4 tablespoons of butter in a medium saucepan. Once melted, whisk in flour and cook for about one minute. Add milk, about two teaspoons of salt and a good pinch of pepper and bring to a simmer. Continue to cook, whisking constantly, for about two to three minutes (when mixture is thick enough to coat the back of a spoon). Whisk in cheese until smooth. Pour cheese mixture over the cooked and drained pasta, and mix together until the pasta is evenly coated.

4. Melt remaining tablespoon of butter and toss with breadcrumbs.

5. Pour pasta mixture in a large baking dish. Sprinkle buttered breadcrumbs on top. Cover with foil and place in the preheated oven for about 55-60 minutes. Remove foil and bake for another 5-10 minutes, or until golden.

Serves 6.


Posted by Picasa

Friday, May 29, 2009

My First Cheesecake (Ricotta Cheesecake)


Last week was my week of freedom between my last final and before bar review began. So I had many ambitions to cook and bake things that I've had bookmarked such as, Paula Deen's Cheesecake cookies, and Penne with cherry tomatoes, asparagus, and goat cheese. So at the beginning of the week, I went to the supermarket, and bought, among other things, cream cheese for the cheesecake cookies, and ricotta cheese for the penne and goat cheese dish. Ricotta cheese, you ask? Well, I couldn't find goat cheese at the supermarket, so I thought ricotta cheese would be a good substitute.

Needless to say, neither of these dishes materialized between running errands, seeing friends I wouldn't get to see during the summer, and graduating from law school. Many of the other ingredients, such as the cherry tomatoes and asparagus, got eaten up by my parents, leaving me with a lot of ricotta and cream cheese. One google search later, and I had a recipe for "Heavenly Cheesecake" - which calls for both ricotta and cream cheese.

Now, this was the first cheesecake I have ever baked, so it's not so pretty. But don't be fooled by its appearance. This cake turned out to be a light and fluffy custard, like eating a cloud in a crust. The topping adds a sweet tangy flavor, but it's good even without it. I used a store-bought crust since I was pressed for time, but making your own as the recipe describes seems easy enough. Plus, it's low-fat! All in all, I would call this a success and I would make this cake again. Except next time, I will work on folding the egg whites into the batter better, which I believe is what caused the brown blotches.

For the recipe, click here.
Posted by Picasa

Wednesday, December 10, 2008

Brownies

Oops, I meant to post this during finals, but instead I'm doing it now.


Okay, so I cheated on this one and used brownie mix and added semi-sweet chocolate chips. But hey, it's finals, after all...


Still looks good, though doesn't? Go Pillsbury!


Posted by Picasa

Sunday, November 2, 2008

Bake Sale Preview

So this is a shameless plug here, but it's my blog, so I can advertise what ever I want! Tomorrow is the APALSA bake sale, so to entice potentially hungry law students I have posted pics of my contribution - rainbow cupcakes and blueberry muffins!


Now doesn't this look tasty? There's only one way to sink your teeth into these cupcakes - come to the bake sale tomorrow!

I have to admit, it takes a lot of willpower not to eat any of these before tomorrow!

Posted by Picasa

Saturday, September 27, 2008

Peanut Butter and Chocolate Chip Cookies


Blame it on the weather, or a burning desire to procrastinate, or for whatever reason, this weekend has inspired not just one, but two blog posts.

This recipe was taken from the wrapper of a bag of Toll House Peanut Butter and Milk Chocolate Morsels. Except the original recipe yielded 5 DOZEN cookies. Not wanting to spoon out 60 cookies, I reduced the recipe by half.

Ingredients:
1 1/8 cups of all-purpose flour
½ tsp salt
½ tsp baking soda
½ cup (1 stick) butter, softened*
3/8 cup** granulated sugar
3/8 cup** packed brown sugar
½ tsp vanilla extract
1 large egg
6.5 oz of Peanut Butter and Milk Chocolate morsels (about half the bag)
½ cup chopped nuts (I used walnuts)
* Tip: I stick the butter in the microwave for about 15 seconds to soften
** This is a little more than ¼ cup. What I do is fill the ¼ measuring cup, dump it in the bowl and then fill it again about halfway.


1. Preheat oven to 375 F
2. Combine flour, baking soda, and salt in a small bowl
3. Beat butter, granulated sugar, brown sugar, and vanilla extract in a large mixer bowl until creamy
4. Add egg and beat well
5. Gradually beat in flour mixture
6. Stir in morsels and nuts
7. Drop by rounded table spoons onto ungreased baking sheets
8. Bake for 9 to 11 minutes or until golden brown.
9. Allow to cool for two minutes on baking sheets. The recipe says to transfer to wire racks, but I can almost never wait that long and start eating them! Yields about 2 1/2 Dozen cookies
Posted by Picasa